heatING SYSTEM SET UP AND INSTRUCTIONS
|
Elite 4 Heater Set Up (DIY200/400)
|
VersaPro Heater Set Up (DIY800/1200)
|
Room Set Up and Proper Air Flow
|
|
|
| ||
HEATER SET UP & INSTRUCTIONS
Upon completing all preparation steps from the Customer Prep Sheet, set-up your heating system for treatment using this guide and follow all instructions to achieve the best results.
Upon completing all preparation steps from the Customer Prep Sheet, set-up your heating system for treatment using this guide and follow all instructions to achieve the best results.
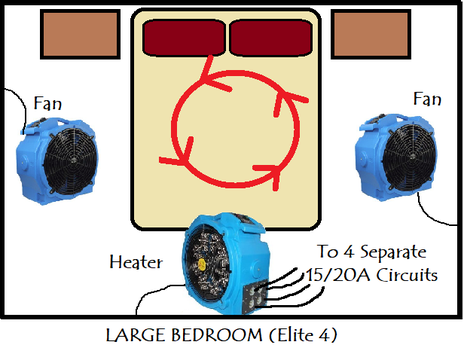
1. HEATER AND FAN PLACEMENT (SINGLE ROOM): Many configurations can be used to heat a single room and almost every one will give you proper temperature rise! Place heater into the infested room and point at the most infested area (typically the bed or couch). Place air moving fans (the number of fans depends on which package you rented) in a manner that best creates circular air movement around the treatment area, like a convection oven. In smaller rooms or tight spaces, just find any available open space and navigate around your furniture (which should be pulled away from the walls a couple of inches). TIP: One air moving fan can be pointed directly at the closet’s door frame to split airflow so some goes in the closet, some stays in the main room. Use your hands to feel for air movement between fans. Be sure to leave plenty of room in front of and behind the heater to ensure nothing gets sucked into the fan (like drapes or paper). Do not place any electronics directly in front of the heater unit.
|
|
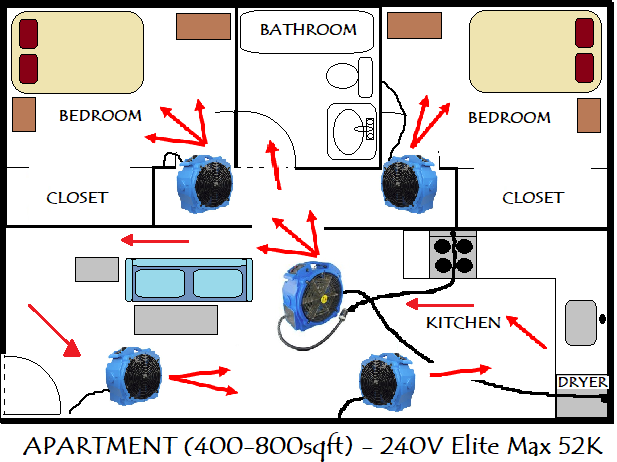
2. HEATER AND FAN PLACEMENT (MULTI-ROOM/WHOLE HOUSE): If heating multiple rooms or your entire home at once, place the heater(s) and some air movers in the largest, most central area to create convection to achieve the most efficient temperature gain (configured like a race track). Other air moving fans should then be placed at each bedroom doorway and hallway entry to drive energized air from the main space into each room (see diagram). The walls can be used to ‘bounce’ energized air off of and direct it towards the next fan. Every situation is different, so use common sense, your best judgment and adjust accordingly later on, as needed.
|
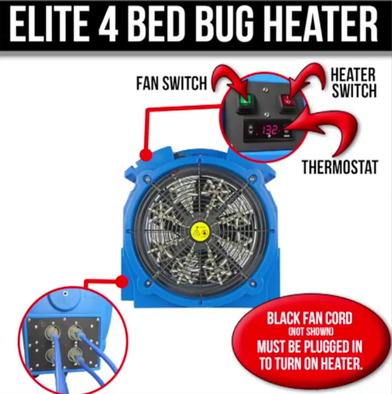
3a. PLUG IN HEATER- Elite 4 (DIY200 or 400SQFT): (Each 'blue wire' heating element draws 12 amps)
|
|

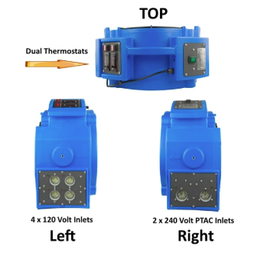
3b. PLUG IN HEATER- Elite Max 52K (DIY800 and 1200SQFT):
- Plug the black power/fan cord into a wall outlet in the room
- Plug larger “stove wire” into house 50 amp stove outlet and connect to matching wire exiting heating unit. Twist to lock. Stove outlet can be accessed by pulling stove away from wall or simply by removing the lower drawer
- Connect smaller “dryer wire” into standard house 30 amp dryer outlet and plug opposite end into Heater. Twist to lock.
- Use extension cords as necessary
- One or both heating elements can be used at any given time
3c. PLUG IN HEATER: VersaPro (DIY800 and 1200SQFT):
- 110V Operation: Same as Elite 4 above (Up to 400Sqft heating capacity)
-PLUS- - 220V Operation: Plug two large black cords into 40 amp stove outlet using yellow “Y” adapter for full power (500Sqft additional heating capacity)
-OR- - Connect one large black cord from heater to dryer (or hotel A/C) for half power (250Sqft additional heating capacity)
- Any combination of heating elements can be used at any given time
4. PLUG IN AIR MOVING FANS:
5. START THE EQUIPMENT:
- Plug in all fans into any available outlet (they do not need separate circuits since they only draw 1.9 amps each.)
5. START THE EQUIPMENT:
- Ensure all equipment is plugged and ready. (Blue extension cord ends should be lit on Elite 4)
- Turn on all Air Moving Fans
- Push green button on Heater to engage the blower fan first. Once fan is on, push red button to engage heating elements. Temperature is pre-set to 135°F and does not require any adjustment
6. MONITORING:
- Check on the system every few hours to ensure it is operating correctly and no breakers have tripped
- If a 110V (15or20Amps) breaker trips, you likely have two blue heater element wires plugged to the same circuit. Remember that each blue wire pulls 12Amps each. Move it to another circuit and reset the tripped breaker
- Target temperatures typically start being achieved in 7-12 hours (depending on room size and building construction)
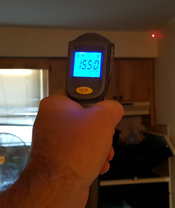
- Use the supplied laser thermometer to take readings of objects in the room. Check everywhere: Inside drawers, under clothes piles, behind dressers, between the mattress and box spring, under bedspread, inside pillow cases, couch creases and folds, behind and between closet items, inside suitcases, all room corners and areas farthest away from the heater itself
- During treatment, point the air moving fans towards any cooler spots as needed
- Heat your space until all areas reach a minimum of 120°F (typically 15-20 hours)
- Once target kill temperatures have been achieved throughout, note the time and continue heating at least four more hours
- Note: It will take longer for heat to completely saturate larger items like beds and inside wall cavities than surface areas, so be patient and allow the system to work. Shutting it down prematurely could easily prevent 100% success
8. GO THE EXTRA MILE (Optional):
- During the period of achieved lethal temperature (over 120°F), you can take additional steps to ensure heat is dispersed throughout and no cool areas exist for bed bugs to seek refuge in. Begin “tossing” any clothes in hampers, drawers or other areas. Separate any stacked items. Hang the bedspread on the closet door. Even stand your bed on edge and make an “A” shape. At 130°F, any bed bug still alive will die instantly once exposed to the heat.
- Note: It goes without saying, but you MUST USE EXTREME CAUTION. The heat will be intense (imagine being inside a hot sauna). This step is 100% at your own discretion and we are IN NO WAY RESPONSIBLE for any injuries that could come as result.
9. SHUT DOWN & COOL DOWN:
- After heating to the desired temperature and time is complete, the Heater and all fans can be shut off. Shut off the heating elements first using the red button(s), and then shut down the fan
- Open your windows. It is ideal to allow the room to cool down slowly and naturally over several hours to prevent possible damage to your things. Expedited cool down using air conditioning or opening windows should wait until temps fall below 100°F if possible
- Unplug and remove all equipment, wrap all cords (If we are picking up, please place everything by the front door)
- Wait several hours before turning on any electronics
- Upon full cool down, it is recommended you thoroughly clean the area and wash/dry all clothes, linens, bed spreads, etc. on high heat. It is also recommended (but not required) that a bed bug residual pesticide is sprayed.
Good Night, Sleep Tight & Enjoy a Bed Bug Free Night!